
Wednesday, 25 May 2016


Friday, 20 May 2016
Artist Interpretation

Artist Interpretation
This piece is what I have created as artist interpretation from one of the artists I had researched for this final project, his name is Steve Bell and he is a 3d modeller, I took inspiration from his generator looking model to create my own looking one, using form as one of the main elements, this is what I had created, along the same lines of generator, mine has been brought up to date more by adding that little screen and a few knobs, but also keeping the old features like the submarine style metal wheel.
Friday, 13 May 2016
Final piece screenshots with annotations
Final Piece Futuristic Power Source
Step One
It all started from this single cylinder, this is the base of the main fixture of the building, from this object, extruding will be taken out to give it a distinctive look.

Step Two
The next step I created a cube, shrunk it thin and elongated it, i then duplicated four times and placed them directly opposite each other around the pivot of the cylinder in the center.

Step Three
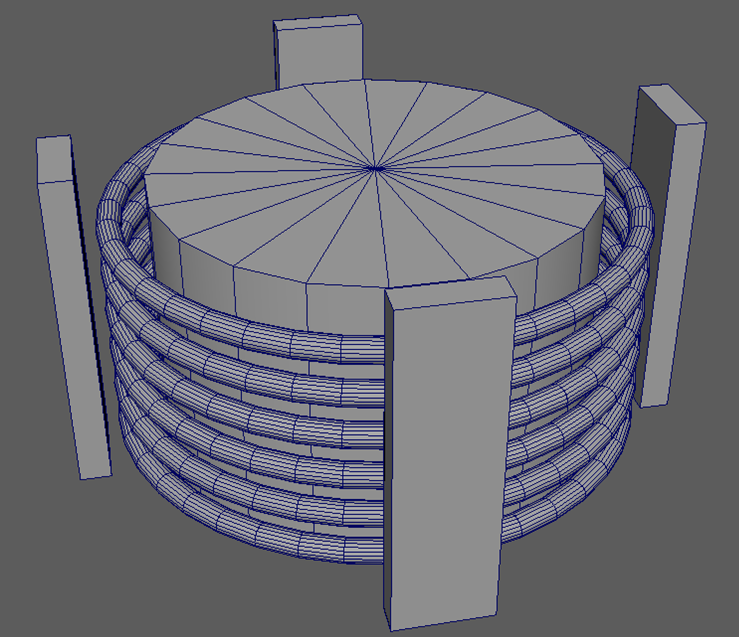
This step is where the detail starts getting added, here I've added whats called, a Torus, when the Torus is created, it adds an extra tab to the material attributes allowing you to change the width and height
Step Four
Here I've added these four posts with heat-fins attached on the top, I really think they have a cool look and make the piece detailed. From this point in my model, shows how i my modelling skills have developed by the attention to detail and creating items that fit together that will have an effect on the finished model.

Step Five
Working on the detail to the base of the Power Source building, adding what will look like, buttons to adjust how much pressure us put into heat-fin post.

Step Six
Here I have extruded the top of the base of the building to create the stem that will protect the transportation of the energy to the base of the building, there are different stages that the energy go through on the way down, explaining the cooling fins in the centre of the stem.

Step Seven
With this building being both an attraction and dangerous, where I have let my imagination take over, this surrounding is both funky and futuristic, I also think that it displays the fact that people should stay away giving it the job along the same lines of a scare crow for the farmers crops.

Step Eight
After letting my imagination take over and keeping it symmetrical, I had realised that there wasn't a clear entrance for the person to mend it if something had gone wrong with the building, therefore I had extruded the faces of one of the sides of the surrounding creating a hallway type entrance.

Step Nine
Now that the hallway for the entrance has been made, now to start thinking about the door that fit on there, therefore I had simply created this door frame from a simple cube and shuffling around edge loops to create the shape that would suit the hallway.

Step Ten
With this being futuristic and the future hasn't yet been written, i have designed another door frame, but smaller, and extruded faces on the outside of the frame to create the slot for pipes further in development of the second door frame.

Step Eleven
After looking back and zooming in and out of the new entrance, I had noticed that the second door frame had a rather large top to it, and looked empty, so I had designed what looks like, a vent on the top, to build up the detail for the final render.

Step Twelve
Now the time to create the doors, with watching Sci-Fi programs, I decided to design heavy duty doors that lock together with a zig-zag style to create the look.

Step Thirteen
After zooming out in the program, I noticed the doors looked a little plain, therefore i had designed what could look like cogs that would spin when the doors would open, which would need work in the animation part of Autodesk Maya.

Step Fourteen
The middle of the doors looked bare as well, so I added some abstract looking armour for the door, following the theme of Sci-Fi and artist Don Pham who works on Sci-Fi pieces in Maya.

Step Fifteen
Coming back to the extruded face on either side of the second door frame, these were the pipes that I was planning on designing for the extruded faces, these are pipes that would control the pressure of the automatic opening doors.

Step Sixteen
This is the other side of the second door frame, these pipes are much more heavy duty and these ones are earthed which contain the wiring for the operation of the door.

Step Seventeen
This is an overview of the whole piece showing off the half bowl that would protect the sphere balls of energy that creates the energy by kinetic movement.

Tom. M

Tom. M
This picture is a plan from
this 6 years of experience freelance architectural draftsman, what I'm seeing
is a detailed labelled picture of a house/building, then two top down views of
both downstairs and upstairs of this design, the plans are labelled nicely and
are full of detail, this is shown by designing the beds with pillows and quilts
on, and the bath has the plug hole and taps marked out.
Tom specialises his work
design using both paper and computer programs, he has stated using technical drawing
on paper, and Auto Cad, Cad, and Photoshop, having skills in both of these
materials show that they are good at what they do and are determined.
I think the only techniques
used would have been imagination and a creative mind with also the common sense
to go with it.
The main elements that he
would have used, would have been colour for the exterior of the houses he
designed to give the builders and idea of which colour would suit the property
best, then there would be line, to create the outline of the house, then the
small details like windows, doors, roof lines, and on the top down see through
designs, the lines would go into making hallways, room layouts and asset creating.
There isn’t much happening
in this piece as they are plans, they are only displaying what could be created
in the future and how it would look.
The one thing I like about
this is the amount of detail gone into the floor planning and positioning.
This relates to my project
as I have designed a house for my futuristic city and was thinking of doing an
experiment as part of architectural studies by making a blueprint or floor plan
for the building I made.
Thursday, 12 May 2016
Steve Bell

Steve Bell
What I'm seeing here is some
sort of generator or cycle cooling source, this piece looks realistic with the
fins on the side and pipes on the side, looks like this item would be placed in
a Sci-Fi futuristic area, I will be honestly this doesn't like it has been modelled with serious high detail in mind, and hasn't been textured, but with
some more work it will look great.
The materials he has used to
create this would have been Maya, and as I can see from this still picture the
lighting effect looks good, and the floor is textured nicely without seams, the
floor texture may have been created in Adobe Photoshop.
This artist has used
techniques like modelling, texturing, but I am unsure whether he has UV’ed the
model as it hasn’t been textured, but the techniques like adjusting the lights
for the shadow effect has definitely brought it to life to a certain extent.
The main elements used in
this would be form and light, as it is a model without texture, texture can’t
be one of them, the form of the object is nice, and the light puts it in the
spot light, which has affected it nicely, but could do with more work and looks
unfinished.
There isn’t a lot happening
as it hasn’t been put into an environment, its just a single piece, the artist
wants the viewer to focus on just his work as there really isn’t anything else
to focus on.
The only thing I like about
this piece, is its very cool looking.
This relates to my projects
because I have designed some building for my floating city and they look quick Sci-Fi looking, like my main entrance door on my power source building.
Miguel silva


Miguel Silva
What I'm
seeing in these images that I have taken inspiration from, looks like a
futuristic looking rural house, seeing images of the model grey work before
texturing, after texturing, and then with added detail like foliage to add to
the crisp blue sky with clouds really brings out the detail and atmosphere. The
immense detail done on the outside, it really makes you think of what the inside
of this beautifully created house and how realistic it would look.
Judging by
these pictures, the highly experience artist has used all the features possibly
and needed within the program Autodesk Maya, but maybe switched to Photoshop to
design where the foliage would look better, like the bushes at the bottom of
the stairs either side of the walkway, and designing only one tree for outside.
The
techniques Miguel used would have been all within Maya, like switching between
materials on the objects he makes, like giving the object a shiny look or a
matte look, and giving the windows a shiny reflective look to give the effect.
It doesn't look
like is really anything happening in this piece apart from a building doing its
job and making the scenery look nice, the artist wants the viewer to look at
what he ha created, having the background detail in brings out the life in his
piece, maybe because he wants to show off the amount of detail he has done and
the skill he has to inspire other people.
I like the
unusual shape of this house as it is very appealing to me and makes me want to
create something like this in the future when my skills have risen.
This relates
to my project as mine is about buildings
and unusual because the future hasn't been written yet, so I'm writing my own
future by creating such buildings that I have designed myself on paper.
Subscribe to:
Posts (Atom)