Tuesday, 22 March 2016
Peer Assessment
This was the likes and constructive feedback I was given after the class took part in a peer assessment activity, from this feedback which I have taken into consideration, I will look into and do more research into other elements of my futuristic project.
walkway experiment
This was the first attempt on a piece of environment to follow the futuristic theme, pretty standard with two identical buildings facing each other with some foliage in the middle along with stairs to break up the scene a little. I may continue to work on this, but as this was only an experiment I might leave it as it is.
Working on experiments like these will definitely give me a better idea and understanding on how environments work and are set, knowing what makes a good environment will improve my final piece, whether its the shapes of buildings, textures to bring the scene to life or the amount of detail to really turn heads and bring compliments.
This experiment will help me develop my final scene with the trees placed down the center adds an attraction to the city, and seeing similar layouts within the real world has made me realize that this could bring the scene to life more and if it was real, it would get attention from the public.
Museum primary research
Primary Research
These are a few images that I had taken form a day out to a museum in Birmingham City Centre, all these picture relate to my work in a various of ways, from the looks of objects, to the layout of ground.
Tuesday, 15 March 2016
foliage moodboard
Foliage in Games
This is a quick mood board that i have put together of a range of different foliages in games such as battlefield and FarCry, there is also a foliage test in the top left, on a range of different types, like vines, bushes, grass and weeds.
black and white render of leaves
Pile of
Leaves
This is a quick render view of two piles of leaves,
implementing different lights on each as a form of texture and software
experiments, the pile on the right lights the leaves all evenly, whereas the
left pile lights parts of the leaves that would appear more healthy than some
of the others, as they still have some shine, having a black and white render
really shows off the effect and experiment I am looking for.
During this experiment I had overcome a problem with rendering these piles of leaves, they wouldn't render in colour, now this was a major problem since I had been spending time on Photoshop making textures for them, experimenting on different colours for the effect, and going through and making sure they're all done for the best possible outcome, such as making the maps have been created correctly.
Here I have created a green cube to show how I overcome the problem of the rendering being black and white instead of colour.
This is the green cube that has been rendered in colour, switching the rendering to colour or black and white is fairly easy.
This is how I got my render back to normal.
To get your render in colour or black and white, you'll need to go up to the windows tab.
Hover over 'rendering editors' then click onto 'render view'.
That will then bring you to the render view, now this render is showing the cube as green, to get to the settings to switch between colour and black and white...
...Head up to the 'display' tab now you can see that only 'all channels' is highlighted, this means that the render view is all RGB which therefore means colour, under 'all channels' it can be seen that 'Luminance' isn't highlighted, this is what happens which it is switched.
Here it can be seen that I have switched my display settings so that 'luminance' is highlighted now instead of 'all channels' which has now made my current and all future renders to be captured in black and white only. This is how I had overcome my problem, having this occur set me back some time in the project, but now knowing how to change it back it won't happen in the future. To prevent this from happening again, I will check and adjust my rendering settings before each render to avoid wasting time.
maya experiment with leaves
Maya Experiments
This is a screenshot of a
quick experiment of a working progress of some leaves which have been placed as
a pile of leaves on the floor, this quick software experiment has two different
types of leave piles, one that is full of green healthy leaves and the other is
of a mixture of the leaves that have fallen over time and have been gathered
into a pile which creates the effect of the bunch all together in a pile.
making of tree texture
Making of Tree Texture
After more research into what I would like my scene/environment to look like, and decided that I would like some foliage in there to give it some colour apart from all the whites, chrome and glass looking colours, some nice natural greens from wildlife may finish the whole look altogether, therefore I decided to create my own texture, so I opened photoshop and started to create a leaf, which we all know can be moved around and duplicated to create some fine looking high detailed bushes and trees. Finally finished a single leaf, I got to work on duplicating and moving the leaf around to create what I’m looking for, this is the first outcome.
I had created a bush look
item from all the little single leaf’s, after finishing it, I created a new
layer and selected the gradient tool and positioned it where the light would it
the foliage if it were in my environment already, which has given it a
realistic finish.
first scene building experiment
First Scene
Experiment
After going through my research into futuristic buildings
and cities, I have found a few buildings that I am quite interested in
modelling, the reason I had chosen this particular building here was mainly
because of its level of detail with and its curvy planes and lack of bright colours, which gives it a really nice finish.
i am slowly working on this experiment of what looks like a floating villa/hut, i am still to add detail to this piece, but as of now, its a working progress.
Texture
Creating My Own Foliage Texture
The image above is a
reference image I have taken from the internet, which I will recreate on
Photoshop, then multiple and position correctly into my own made texture for
foliage of a tree for my scene.
This is the single leaf after I have recreated in Photoshop.
This group of leaves is just the single leaf duplicated multiple times and repositioned to create this pile of leaves on the floor.
Here i have added some colour into the texture, since not all leaves are perfectly coloured green, and some are in front of others in growth and seasons.
This is a more in depth experiment with colour than the first, showing more of the decay in the leaves.
These three images are the specular maps that will be applied within Maya, each one has more depth than the others, this will create the shine within the modelling software.
This image is the normal map for the texture, this creates the 3D look even when the texture is placed on a flat surface polygon.
Tuesday, 8 March 2016
Current skills and improvement
My
current skills
Maya
-Strong modelling skills from mind and reference .
-Inspiration from images to create and improve my ideas.
-Being able to UV my created models.
-Importing and exporting work.
Photoshop
-Simple designs
-Slight experience in concepts.
-experience in developing of ideas.
Skills
to improve
-All design work within Photoshop.
-Creating my own textures for models in Maya.
-Paper drawing skills
I can easily start to improve the skills I need to
improve on this project by definitely spending more time on photoshop, and use
the program more when focusing on software experiments, practice texture making
skills and improve them as I go, and definitely spend around 30 minutes a day
with a pencil on some paper.
proposal
|
||||||||||||
UAL Level 3 Diploma
in Art & Design
|
||||||||||||
THIS SECTION TO BE COMPLETED BY THE STUDENT
|
||||||||||||
Student
Name
|
Student
Number
|
|||||||||||
Liam
Evans
|
Bmc131436856
|
|||||||||||
Centre Name
|
Centre
Number
|
|||||||||||
Birmingham
Metropolitan College
|
20313
|
|||||||||||
Subject
Specialism
|
||||||||||||
3D
Modelling
|
||||||||||||
Working
Title or Theme of FMP
|
||||||||||||
Futuristic
city
|
||||||||||||
Number of
words
|
Personal
Tutor Course
Leader
|
|||||||||||
505
|
Shiam Wilcox
|
|||||||||||
Signature
|
Date
|
|||||||||||
Guidance
|
||||||||||||
For
your Project Proposal you must provide an outline brief of your
Final Major Project. This brief will normally be of your own choosing. Where
the brief is set by your tutor, or where you are working on a group brief
(with other students) please make sure that you cover how you will respond
individually to the brief and/or your individual
responsibilities/contribution to the work of the group.
|
||||||||||||
You
should give careful consideration to producing a focussed outline
brief:
|
||||||||||||
Section One:
What is
the title of your Project? What will you work towards producing and what is
your proposed end point? Explain how this relates to your work and ideas and
how it extends your knowledge, understanding and creative ability.
|
||||||||||||
Section Two:
What are the influences, starting points and
contextual references and why are they relevant to your ideas? Indicate the
subject areas you intend to research and the likely sources of information
including any museums, specific locations, performances, etc you plan to
visit. However you should not make extensive lists in this section. Instead
you should compile an accurate bibliography correctly acknowledging all
references including texts, periodicals, websites and video/DVD’s etc. Enter
your bibliography in the APPENDIX.
|
||||||||||||
Section Three:
Refer to
any techniques and processes you intend to use. Describe the range of media
and materials relevant to your project and how you may use them to explore
and develop your ideas. Include aspects of studio practice, workshop
procedures or the use of particular equipment and software etc. Provide an
indicative timescale for your project and indicate the manner in which you
intend to divide your time in order to investigate, develop, produce and
evaluate your project appropriately. This should be a meaningful plan to you
and should be personalised to your project. You may wish to write your plan
as a daily or weekly schedule in which case enter your timescale in the APPENDIX.
|
||||||||||||
Section Four:
How will you critically review and analyse your work and determine
if it is successful? How will you identify directions for ongoing
development? Do you have a method to record the critical response to your
ideas? How do you propose to assess the success of your Final Major Project
and what will be your methods of evaluation? Unit 6 requires you to produce a
supporting statement at the end of your project for your exhibition. This
section can inform your analysis.
|
||||||||||||
You are advised
that the bibliography and time scale may be attached to the Project as an
appendix.
|
||||||||||||
Your Project Proposal must be no
less than 300 words and no more than 500 words.
|
||||||||||||
SECTION
ONE – The Final Major Project (guide 100 words)
|
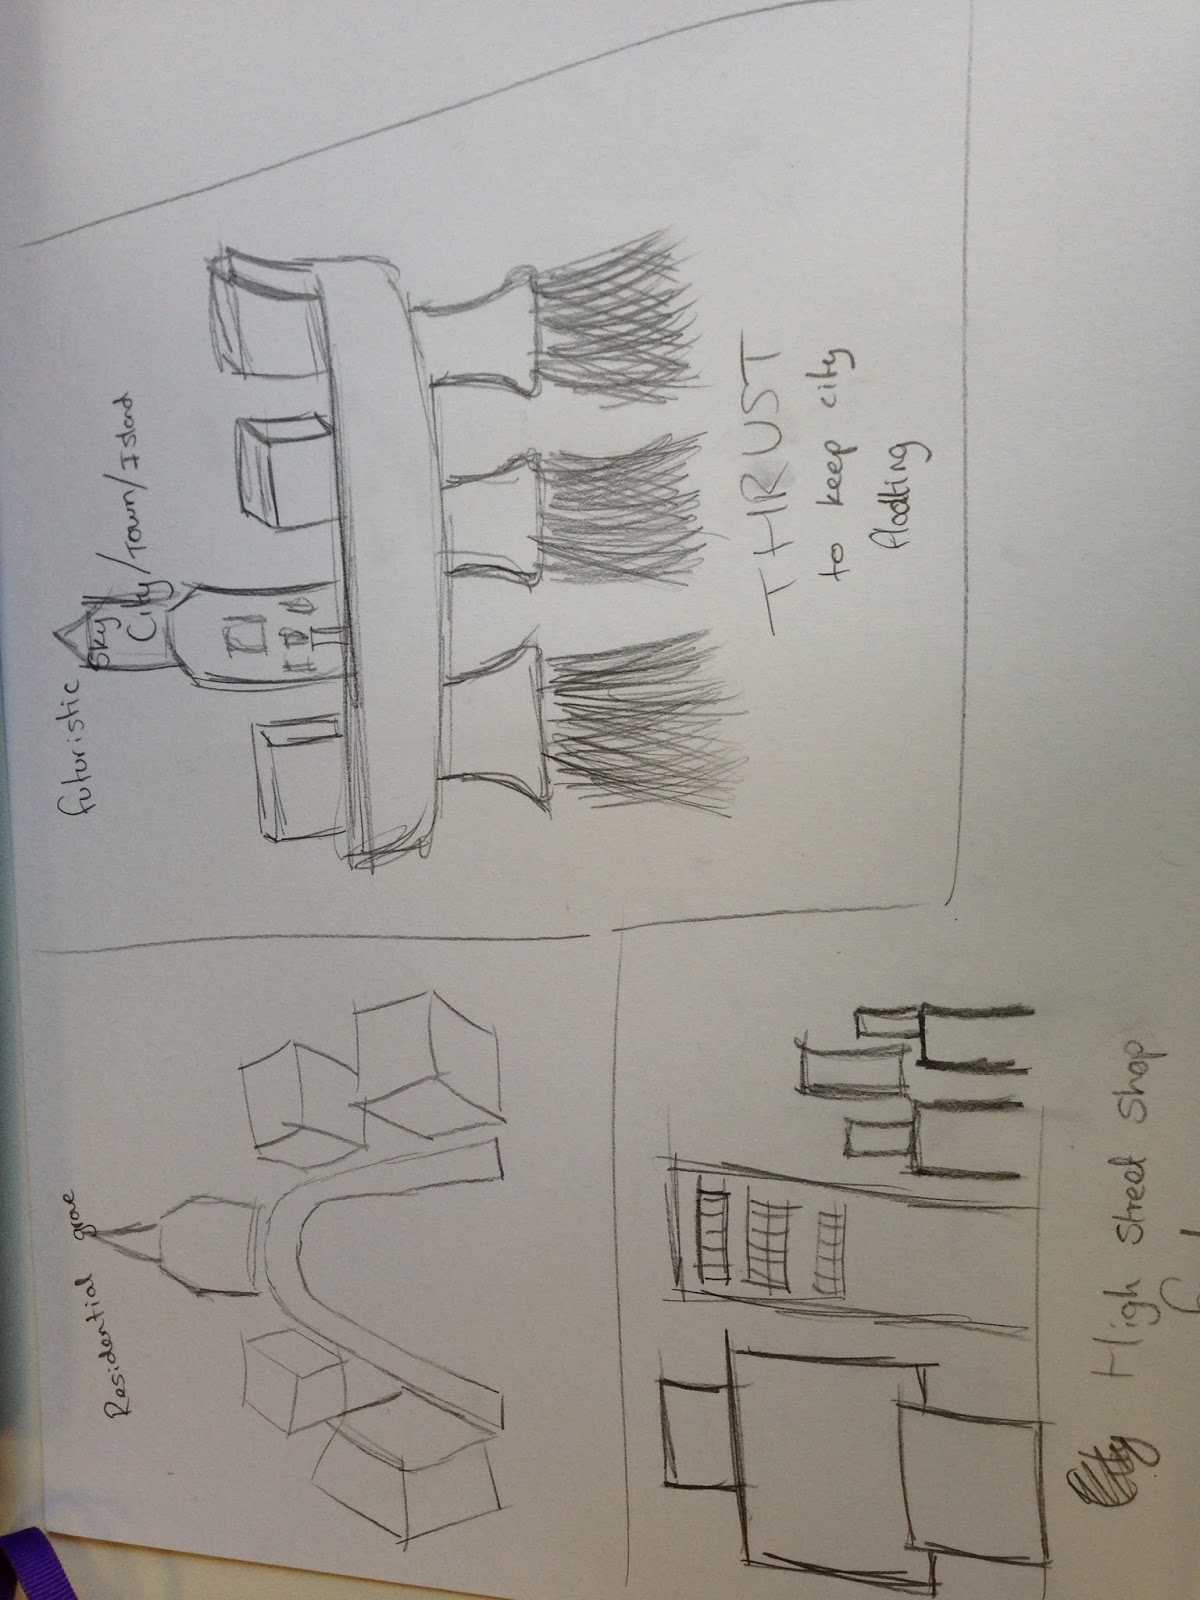
THE LAND OF MODERN – I will be
following the theme of futuristic buildings, land and just the environments
in general, looking into creating my own type of futuristic looking
environment with my own designed buildings with a look that I have chosen to
give them. The final piece I wish to have is a futuristic looking world where
I could picture people living if it was to become a real world. I will take
into consideration some of the futuristic looking buildings that have been
made and are used on the daily in our world as it is now, also some of the
concepts that have been created in similar software to which I shall be using
very shortly.
|
SECTION
TWO – Influences, Research, Sources and Ideas (guide 100 words)
|
My
influences for my current FMP project will be taken from research into
current and passed professional 3d environment artists and concept artists.
I’ll look at their work and maybe use their skills as inspiration and
techniques to take into consideration and use in my own work, my main idea is
to make a clean and open futuristic city/village/environment with detailed
buildings using 3d modelling software, along with design work done by hand,
also with thumbnails. With my idea, I reckon a futuristic city/village would
definitely be involved in a game, a game along the lines of futuristic
apocalypse, or a game based on the recent game (Elite: Dangerous) which is a
futuristic space adventure game, trading and a combat simulator, since I like
the idea of a floating city, maybe it could be a floating futuristic city/village/dock
for space ships in space if I were to follow the elite: dangerous game.
|
SECTION
THREE – Techniques, Processes and Timetables (guide 150 words)
|
The
main things I will be using will be mostly used evenly from pencil and paper,
to Photoshop, and Autodesk Maya, and maybe Autodesk Mud-box for characters I
may consider making. Pencil and paper for initial ideas and developing of
ideas, then move onto photoshop for experimenting and develop further, parts
of my environment I will consider drawing and developing will be street
furniture, a possibility of vehicles, and layout of how buildings will be,
after completing them, I will move onto software experiments, and if the
experiments are finished to a high enough detail and I’m happy with them I may
consider using them in my final scene. Doing all this, I will keep to my
timetable as strict as I possibly can.
|
SECTION
FOUR – Method of Evaluation (guide 150 words)
|
I
will evaluate my work in part, I will do an evaluation of my work so far
around half way, but I will evaluate my work by describing what has been
completed throughout the project, then I would go through all the points both
good and bad that had happened, and how I had overcome them by changing the
way I did things at that time. Problems that occurred in software such as
Autodesk products like maya and mudbox, also programs like adobe photoshop, I
would evaluate problems that may occur during software experiments or design
work, after all that, I would go over the points, if I would change anything
throughout the process.
|
APPENDIX
– Use this appendix for your bibliography and/or action plan for your
Final Major Project
|
-ideas
-Research
-moodboards
-design
work
-final
piece
-evaluation
|
Friday, 4 March 2016
Gantt Chart
GANTT CHART
This is my project plan which I had created on 'Gantter', the plan I have made is to help me along the project, and objectives that I set for my self to complete within a certain time scale, having these objectives will definitely increase my focus on a project like the FMP as objectives like I have set will be very similar or even more strict than they are within the work place.Thursday, 3 March 2016
Engine Thruster initial idea/observational drawings
INITIAL IDEAS
This jet thruster engine initial idea was just an experiment on whether I would choose the floating city/village idea, because everything in the futuristic world isn't confirmed and is just fantasy at the current moment, I have decided to give a floating city/village some jet thrusters to keep it in the air, that would maybe run on hydrogen since we know that or future may possibly be running without oil, which means no fuel, therefore these engines will need a natural source of power.
This is the experiment of a thruster that I created as an initial design on paper, then decided to 3d model it to see the outcome, in the process of this design, I didn't really come across any problems in the making, after completion, and rendered I noticed that it had a really nice finish look to it.
First 3 initial ideas
INITIAL IDEAS
These are the first 3 quick sketches I did of rough initial ideas for my environment, I will now develop these further with detail, and decide on which one to choose from, I need to research and take into consideration on which will look the nicest when the finished idea is complete and will have the most amount of detail that will turn the heads of people who view my work.
Game research
I'm going to take influence from a game released a few years
ago called Anno 2070, the reason I'm going to look into this game for influence,
not because of the style, as its far from what I'm looking at making, but its
level of detail and structure to the buildings, I would like to maybe recreate
a few pieces of work from this game as it would help me in the design process
of my own buildings. I may also look into the vehicle side of Anno 2070 as they
are unique in there own way, and could use them as reference for vehicles I might
create for my own scene.
ANNO 2070
Anno 2070 is a city building
and economic simulation game with real-time strategy elements. It’s the 5th
game of the Anno series, released on the 17th November 2011 and was
co-developed by the German studios related designs.
PLOT
The scenario is set in the
year 2070, global warming has melted the Arctic ice cap which has raised the
global sea level so that the coasts were flooded. As a result, many cities have
vanished under the ocean, and much of what was once highland has been turned
into chains of new islands. Responsibility for settling and exploiting these
new frontiers is given to a select group of people, who captain mobile
ocean-going bases known as Arks.
GAMEPLAY
In Anno 2070, politics are
no longer defined by countries, boundaries, religions, races etc. All humankind
rally under one global government where the three main factions of the game
control the world’s decisions. Players can also vote for the world president
and vote in Senate council. Participation will give different effects to all
players, depending on who is president or what bill was passed, until the next
cycle of voting begins. For example, voting for the Tycoons’ CEO Skylar Banes
will increase productivity of manufacturing buildings.
Players can also gain
achievement and rewards from just playing the game, players can customize their
Ark to fit personal reference, which is only for aesthetics, as well as gaining
special rewards that affect gameplay.
Resources are technology
upgrades can be carried on Arks, and be used in another game in “Continuous
Mode”
FACTIONS
Tycoon
Leader: Skylar Banes, CEO.
This faction is representative of the Global Trust, Earth’s number one leading
energy supplier in 2070. Tycoons like to exploit resources quickly for
immediate use, which leads to workers that are richer and can pay more taxes.
Eco
Leader: Seamus Green,
founder and spiritual leader. This faction is representative of the Eden Initiative,
Earth’s most influential environment organization. Ecos rely on green
technology to create their cities, which preserve nature and help the eco
balance.
Tech
Leader: F.A.T.H.E.R. super-intelligent
AI. This faction is representative of the S.A.A.T. (Scientific Academy for
Advanced Technologies) and are the supreme inventors of technology and masters
of the underwater world. They designed the Ark and E.V.E., as well as building plans
for aircraft, submarines and missiles.
I got this information from research online:
(REFERENCE URL:https://en.wikipedia.org/wiki/Anno_2070)
I got this information from research online:
(REFERENCE URL:https://en.wikipedia.org/wiki/Anno_2070)
Subscribe to:
Posts (Atom)